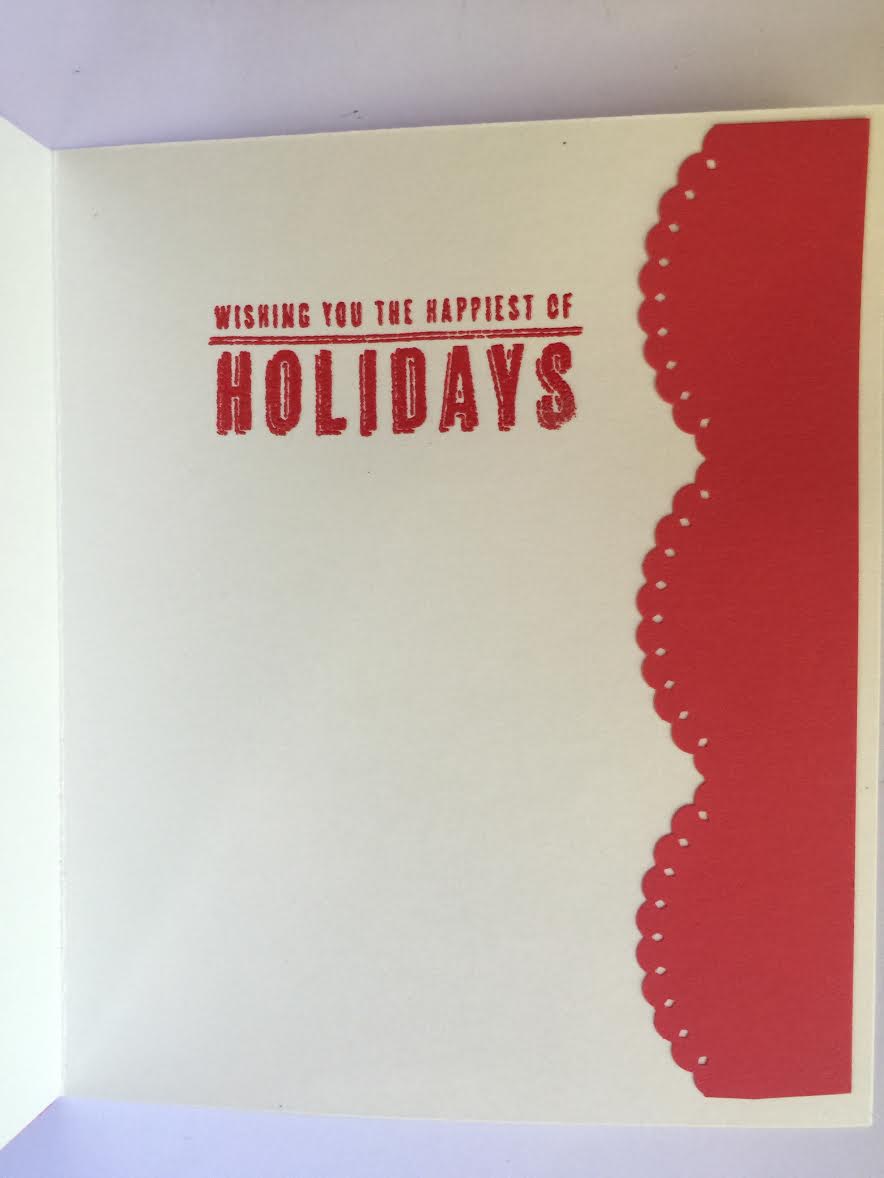
I STILL have pieces of paper leftover from previous cards. I cannot throw away anything but the smallest of scraps. I confess, I'm a paper hoarder. Somebody get me on that Hoarder's show! I'd react the same way they do. "But I'm going to use it someday," I'd whine, visions of unmade cards dancing in my head. Only, my visions are of gorgeous paper and not rodent feces covered Starbucks cups.
I'm a bit more organized too.
Just a bit.
I have a punch that creates these ruffles, so I thought it might be nice to punch the scraps and make a ruffled Christmas card. This punch was a gift and a nice one, I have used it quite a bit.
Is that what you call it, ruffles? Maybe scallops. Chemo-brain makes it near impossible for me to remember the right terms and I've noticed it with each of these card blog posts. Unlike when you are writing creatively, with these you need to know the names.
Sigh.
Anyway, it came out kind of cute.
But you can't tell which way it is supposed to go, so I am going to have to put an indicator on the outside.
See what I mean?
Back again.
Here's the inside, so it does matter. Unfortunately, I didn't realize it could go two ways until I was done - and I like it the second way better. OH well, guess that means I'll have to do another.
I thought about using embroidery thread and sewing through the holes, but I decided it was busy enough. I only put red inside so you could see it from the outside.
I'm about done with those scraps....but I still have a few. Hmmm....how creative can I be? I mean, a tree died for my card, I should use the entire product up, right? So if you get a card with scrap of paper just glued to it, you'll know why.
Products used on this card:
Border Punch Scallop (mine is old so I can't find the same brand online)
Red cardstock
WRMK North Pole Christmas Cardstock (I have the 12 x 12 but I can only find it in the 6 x 6 pad)
Red Zing embossing powder
AC "Mistletoe" Christmas Stamps (can't find online)
Versamark
Metastatic cancer took my job, endurance, and energy. It gave me friends and a desire to thank them. Combine that with a paper addiction, and you have the One Card a Day Project!
Tuesday, June 30, 2015
Monday, June 29, 2015
Card Nine - Spectrum Noir Sunflower
Sunflowers are so cheerful! I have a stamp from IndigoBlu (yes, you've noticed I like their stamps) and so I decided to color.
Coloring is such a meditative thing to do. It reminds you of when you were six, of course, but it is something to do while listening to a podcast or otherwise occupying your mind. For those of us with no artistic ability, coloring can make us feel like artists.
I used Spectrum Noir Alcohol Markers for my coloring. I stuck to the GB (Golden Brown) line for the petals and did the EB (Earth Browns) for the center.
I remember when I ordered them. I was pretty sick at that point, and my day consisted mostly of sleeping. I wanted to do something simple while sitting in the light, so I treated myself to the entire set of alcohol inks. They arrived the same day my friend from Salt Lake City did, (she was coming to maybe say good-bye, hah!). We sat around my dining table and colored pictures we'd printed. Although I was the one who does the artsy crafsy stuff, she turned out to be the much better colorist, knowing where light and shadows should fall.
Oh well, it was still fun for me. She was bored.
So for the card, after I colored it, I fussy cut it out. I mounted it on a piece of wood grain paper. I had a scrap of yellow gingham so put that on the bottom with a golden ribbon. I took another piece of the wood grain and cut a tag and stamped it with a tiny bee and the words "Bee Happy."
I tried a copper zing but it didn't show the details of the Bee so I stick with Versamark Fine black ink. It shows more in person.
I colored two of the sunflowers so you will see another on a different card.
Sunday, June 28, 2015
Card Eight - Gilded Lollipop Tree
Isn't this cool?
Products:
Black Cardstock
Speedball Gold Flake
Sizing Glue
Gold Embossing Powder
Wishes Stamp from a set I had, heat embossed using Versamark and gold embossing powder.
Indigo Blue Lollipop Tree Stamp
Gold Ripple Holographic Paper
Gold Bling
My glue was old so I ordered more. I will do this card again with fresh glue and see if I can get more detail out of the stamp. I love this stamp, it's one of my favorites but I haven't used it with ink yet! That may be next.
So what do you think about these cards? Are there any you would like?
Saturday, June 27, 2015
Card Seven - Masculine
Like the pink card I did earlier, I am imposing my gender preferences on a recipient. This is actually a card I made some time ago for a friend so you won't get it, sorry.
It is quite simple. Black cardstock is the base, and I found a black and grey striped piece of paper from my stash. I mounted that on the cardstock and again cut a smaller piece of plain black. I had a silver/grey ribbon I wrapped across the bottom and put it all together. I also cut a 2 inch circle from black cardstock and took some silver Dazzles and mounted them to make the pattern you see. (If you click the link, the dazzles I used are the upper right ones in the picture)
For those who don't know, Dazzles are from a company called Hot off the Press. I really like their products and I really hate their customer service. It's a problem!
Dazzles are embossed stickers. You can find them from other companies but not in the wide variety from HOTP. I'm going to be sad when I run out because I'm not sure I want to buy from HOTP again.
In this case, I believe they were supposed to be a clock face, but I just used them as a design, and I took the minute hand and mounted it on the ribbon as you can see. Finally, I used a "just because" dazzle sticker on the bottom right.
If this is too much description for you, let me know. I can just use a list of materials if that would be easier.
Friday, June 26, 2015
Card Six - Homespun Christmas Scraps Banner
I had lots of strips of this paper leftover from yesterday's card, so I figured I'd do more banners. The goal is to try to make each card different so I couldn't just copy, that would be cheating. (Although I might do a couple of the same ones if I like them, so call me a cheater.)
Again, I used a one inch square punch to cut the banner ends. I used a plain pre-made card from Michaels. I placed the banner strips so that they were not straight up and down this time - I wanted a more homespun look to match the paper. I glued them on just using a glue stick, and then used this wonderful leaf ribbon I found in some little store.
I love that ribbon, I've used it in several other projects. It comes in other colors so I will probably get more. It's one of those things that seems to come in handy more often than you would expect. They have it on Amazon in the green and gold, and I've seen it in cream, which is a good buy as you can then use alcohol markers and make your own colors. I've gotten in the habit of buying things in white so I can color them myself.
Back to the card - I cut a few individual leaves (leafs?) off and added them on the vine to make it appear there were two coming from the same area. I glued it down, and I added some red jewel dazzles. Now it looks like holly, right?
RIGHT?
Well, festive anyway.
I thought I'd outline the card in a cranberry color ink as it looked so plain. Well. Um. I think the word for this is "homespun" right? My cranberry ink pad crumbled as I was edging the card. Literally - big hunks of foam came off on the paper, streaking it and making a mess. It was an old pad, ten years or more, but I use it regularly; it is one of my favorites. Last time I used it it was fine. This time?
I thought ink pads just dried up and blew away when they become too old. This one had plenty of ink, but disintegrated. On my card.
Actually, on your card.
I decided to call the edges artistic, but the mess also made my hands "artistic." My plan was to stamp the word "believe" above the ribbon on the left and call it a day but I got a red dot of ink right in the center of the card.
I tried erasing it with an art eraser. I tried using a clear alcohol marker to erase it. Nope. I had to cover it up or junk the card.
I took a spellbinders nestabilities label and cut out the two parts you see above. On the inside part, I stamped "believe" and again used the Zing Leaf embossing powder and heat set it. I coated the outside frame with versamark, used a red embossing powder and also heat set it, and placed it where my smear was.
This card became my nemesis. I dropped everything. I had to re-emboss the frame twice because I wiped off the versamark in a spot. There are prints where there shouldn't be. The jewelled dots kept falling off. Making this card created a mess, all because of the curse of the cranberry ink pad. Whoever gets it may not get the prettiest card in the world but they will know I continued on in spite of hardship. It's a symbol of resilience in adversity - or something. Hopefully, it won't be a crumbled pile of paper in the envelope! That would be a bad symbol.
When you see the word "homespun" you know what it means -- visible mistakes. :)
For those who don't know, I am linking to the products I use on Amazon. If you click a link and buy anything in that shopping trip (even things I haven't linked to, like a lawn mower or a book) I will get a very small percentage of your purchase. So please start your Amazon shopping from either of my pages, even if you aren't buying scrapbook stuff. That's how I pay for the items to make these cards, and I now I have to buy some cranberry ink.
Thursday, June 25, 2015
Card Five - Christmas Banners
I have a paper pack by We R Memory Keepers called North Pole. It has the traditional red and green with some pale blues, and many of the papers have that cool scuffed look. Because I am into the December Daily I always look for matching Christmas papers, and this set is perfect, they all match each other so you can't go wrong.
I have the 12 x 12 pad, which also comes in several sheets of 6x6 designs. I wanted to do a banner page, so I took one of the 6x6 pages and cut it in strips, and again in a variety of sized pieces. To make the banner ends, I used my square punch and clipped the strips to get the design. That means you aren't left with any funky cuts as you get when doing it by hand. I got a sheet of robin's egg blue paper, which was also a color in one of the designs, and I played with it until I got the look I wanted and glued it down.
I'd intended to do a ribbon and bow for the strip across, but I didn't have any thick enough ribbon. I also felt it looked funny with blue on the bottom and nowhere else. So I cut a blue stripe and glued it across, then took a leftover red strip, and then added a vanilla piece, same color as the card. I stamped the word "believe" using Versamark, and then added a few stars. I love to heat emboss, so I embossed with some Zing Leaf powder.
I have a lot of strips left! I wonder what will happen to them?
What do you think of this card? What could I have done to improve it?
Wednesday, June 24, 2015
Card Four - Christmas Lamp Post
Who doesn't like to color? I find it very soothing.
I found this stamp by Penny Black and had to get it. In my opinion, Penny Black makes some of the best stamps for coloring out there.
I stamped the image onto cream cardstock using Momento ink. When you plan to color with alcohol inks, you have to use Momento - something like Staz-on will smear. After I stamped it, I colored it in using Spectrum Noir pens, which are more affordable than Copic. I used the True Blue line for the blues and the Ice Greys for the greys and the dark red for the bow. Green was using my one and only Copic, with a little Jade for shading. I used the lightest Citrus for the yellow of the light with a few dots of the Brown/Orange.
Once colored, I used a Spellbinder Nestabilities label to cut out the shape, and then I went around the edges with a silver Wink of Stella for a bit of shine. Then at the bottom, for the snow, I used some Stickles glitter glue in Diamond. I mounted the shape onto some old blue dotted blue paper I had for at least a decade, and then on top of it I put a transparency overlay that had white "snowflakes" on it for shimmer and an extra dimension. I hid the mini glue dots under the largest white flakes!
I am going to tie a silver cord around the side of the card .... when I get silver cord.
I like to color even though I have a lot to learn about light and shadow - so more coloring ones will appear. :)
I found this stamp by Penny Black and had to get it. In my opinion, Penny Black makes some of the best stamps for coloring out there.
I stamped the image onto cream cardstock using Momento ink. When you plan to color with alcohol inks, you have to use Momento - something like Staz-on will smear. After I stamped it, I colored it in using Spectrum Noir pens, which are more affordable than Copic. I used the True Blue line for the blues and the Ice Greys for the greys and the dark red for the bow. Green was using my one and only Copic, with a little Jade for shading. I used the lightest Citrus for the yellow of the light with a few dots of the Brown/Orange.
Once colored, I used a Spellbinder Nestabilities label to cut out the shape, and then I went around the edges with a silver Wink of Stella for a bit of shine. Then at the bottom, for the snow, I used some Stickles glitter glue in Diamond. I mounted the shape onto some old blue dotted blue paper I had for at least a decade, and then on top of it I put a transparency overlay that had white "snowflakes" on it for shimmer and an extra dimension. I hid the mini glue dots under the largest white flakes!
I am going to tie a silver cord around the side of the card .... when I get silver cord.
I like to color even though I have a lot to learn about light and shadow - so more coloring ones will appear. :)
Subscribe to:
Posts (Atom)